
Are you one of those people who want to create a chat app? Perhaps you already have one, but simply want to improve your existing app.
Chat apps have gained substantial fame throughout the years. Not only have these apps turned out to be an excellent way to stay connected with your relatives or friends. They have also transformed as a convenient tool for numerous small and giant companies in simplifying the communication along with their customers and teams.
Today, did you know that you could as well make a chat app with Deno and WYSIWYG editor?
In case you didn’t know, Deno is a secure TypeScript runtime designed on V8 – the Google runtime engine for JavaScript. One of the amazing features of this software is its emphasis on security. By default, Deno performs the code in a sandbox. That suggests runtime has no access to:
- the environment variables
- execution of other scripts
- the network
- the file system
We would also like to highlight a few benefits of using Deno and the reason why it pitches itself as a better runtime.
- It is designed on Rust
- It utilizes promises all through
- It has TypeScript support baked in
- It is a secure and protected runtime environment by default
- It surpasses a few shortcomings of Node
The latest version was released a few months ago. Since then, it has been gaining massive attention, along with a broad spectrum of tutorials and information on how to get started with the app itself. There are also sample apps emerging on the internet.
We noticed one Deno chat app from The Codeholic as one of the recent examples. We are quite astonished and pleased by the concept of adding WYSIWYG editor to it. That’s why we wanted to use it as a model. We will highlight to you how simple it is to improve any of your chat applications with rich text editing powers.
Now, do you want to know more about this topic? In this post, we will walk you through the major modifications, which were done to the project to include the TinyMCE Editor in just two easy steps!
Without further ado, let’s begin!
Step 1. Run the Deno Chat App
Are you enthusiastic about getting the app running? Do you want to learn it for yourself first? We have made a good repo here.
To run the Deno Chat App, here’s what you need to do:
- Clone to the repository. You can do that by running the git clone.
- Run deno run –allow-net server.ts
- In your browser, open public/index.html
- Add your name, choose a group to join and click the button Login
- Do you want a demo for two or more participants? In another window, you can open public/index.html and join the same group
Step 2. Add TinyMCE to the Deno Chat App
Keep in mind that this step is where the major steps will be covered when adding the TinyMCE to the Deno App. But before you do that, make sure you figure out first the code on GitHub for the full context.
- Add the TinyMCE script
First of all, we have added the TinyMCE script in the head of public/index.html. We have replaced no-api-key along with a valid Tiny Cloud API key:
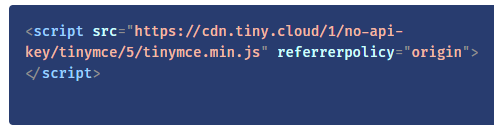
If you want to acquire a Tiny API key, you can find a free one here.
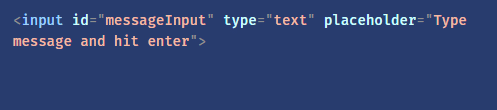
Keep in mind that we also consider the existing input field id – messageInput:
- Configure the TinyMCE Editor
The next step you need to do is to add the TinyMCE initialization script in public/client.js. That will determine the ID of the form input as the element to initialize on – selector: ‘messageInput.’
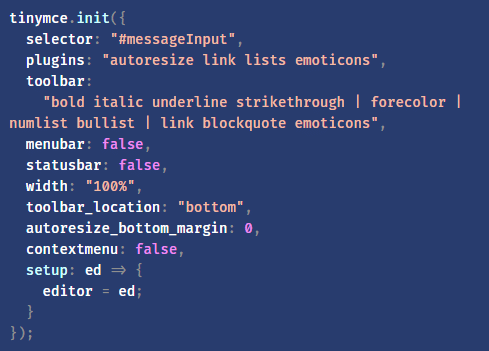
Keep in mind that TinyMCE is very flexible. In fact, you can organize it for nearly any use cause and for the user experience you are targeting to accomplish. Some of the key configurations you can use are as follows:
- setup
You need to set a global variable editor if you want to access it on form submission
- toolbar_location
You need this key configuration to place the toolbar on the bottom part of the editable portion
- toolbar
This is necessary to determine the options given to users as well as their ordering on the toolbar
- plugins
Its role is to import any necessary plugins
Bear in mind that we have also performed small modifications to sendMessageForm.onsubmit. We wanted to receive content from the TinyMCE editor on sending – editor.getContent() – and to clear the editor after it was delivered – editor.resetContent().
What to Do After?
For the final step, make sure you check out at doing a modification, which will enable users to send on enter. Perhaps, it would be ideal if you can include the Text Pattern plugin to allow automatic text replacement with your personalized text arrangements.
After you have included TinyMCE in your app, make sure that you also take into account the other alternatives that may be helpful for the consumers. To get you an idea, we have written some posts on customizing the TinyMCE toolbar. The best part here is you can also try out various Tiny icons and skins.
The best part about Tiny is that we take pride in our broad spectrum of free and premium plugins. That includes the highly sought-after PowerPaste.
Bottom Line
We are very thrilled about Deno as everybody else. Deno covers a bunch of amazing features such as TypeScript documentation too. You will notice the benefits of Deno in nearly every other post. However, we believe that’s something, which needed to be mentioned.
Frankly, Deno appears like a wonderful way to create a chat app, especially combined with a WYSIWYG HTML Editor. Do you agree or disagree with us? We would like to know your insights!
So there you have it! We will now conclude our post on how to create a chat app. Do you have any concerns about this post? If so, feel free to share your opinions by leaving your comments below!